
To maintain consistent flavor, clean your Breville coffee grinder every 2 to 4 weeks by using a soft brush to remove grounds and a vacuum to clear the burrs. This process prevents stale oil buildup that ruins your coffee. It’s the best way to keep your machine running smoothly without damaging delicate parts.
Supplies for cleaning your Breville coffee grinder

To complete this maintenance task, you need a few specific items to ensure you don’t damage the internal components of your machine. Having these ready before you start will save time and keep your workspace tidy.
- A soft-bristle brush, preferably one with nylon bristles to avoid scratching the metal.
- A handheld vacuum or a vacuum with a small nozzle attachment for deep cleaning.
- A clean, dry microfiber cloth for wiping down the exterior housing.
- A wooden toothpick or a bamboo skewer to gently dislodge stuck grounds from tight crevices.
- A small bowl to hold the upper burr and any small screws you remove.
You don’t need harsh chemical cleaners or water, as moisture can cause rust on the steel burrs. If you lose the specific cleaning brush that came with your unit, a soft-tipped pastry brush is a safe and effective substitution that doesn’t cost extra.
Step-by-Step Cleaning Process
Following these steps ensures your machine remains in top condition without risking the integrity of the motor or the burr assembly.
- Unplug your machine from the power outlet to prevent accidental activation.
- Remove the bean hopper by rotating the locking dial and lifting it straight up, then empty any remaining beans into an airtight container.
- Unlock the upper burr by rotating the handle and lifting it out of the machine housing.
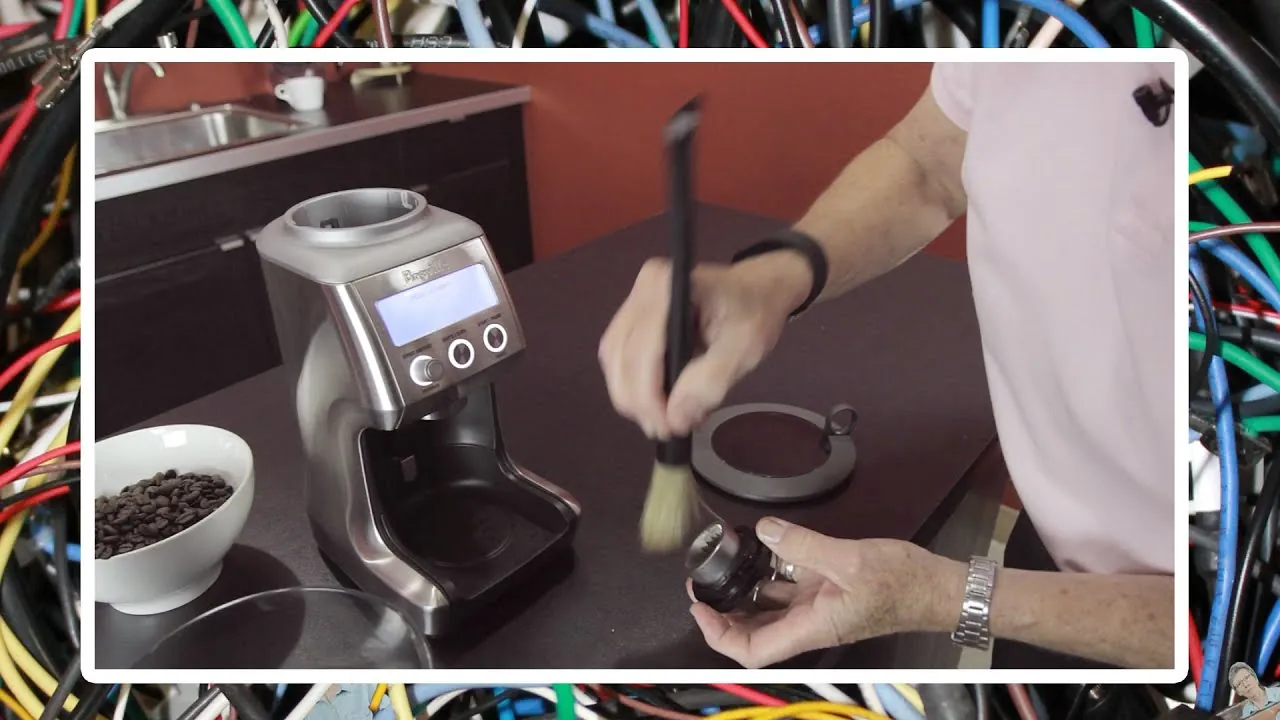
- Brush the loose coffee dust from the upper burr and the lower burr located inside the unit.
- Use a vacuum nozzle to suck out the remaining grounds from the burr chamber, being careful not to touch the metal parts with the hard plastic nozzle.
- Wipe the exterior of the grinder with a damp microfiber cloth, ensuring no water drips into the internal electronics.
- Reinsert the upper burr and lock it back into place by turning the handle until it clicks.
- Replace the bean hopper and lock it before plugging the machine back into the wall.
Careful: Never use water or soap inside the burr chamber, as this will lead to rust and ruin the grinder’s precision. Tip: If you notice coffee oil buildup, use a dry cloth to wipe the metal surfaces; if the oil is stubborn, you can use a specialized coffee grinder cleaning pellet according to the manufacturer’s specific instructions for your model.
Adjusting for Usage Frequency
Your maintenance schedule changes depending on how often you brew. If you use the grinder daily, you’ll need to clean it more often to prevent stale oils from affecting the taste.
| Usage Level | Cleaning Frequency | Time Required | Watch For |
|---|---|---|---|
| Daily | Every 2 weeks | 10 minutes | Fine dust buildup |
| Occasional | Every 4 weeks | 15 minutes | Old bean oils |
| Light | Every 8 weeks | 20 minutes | Clogged exit chute |
It’s always safer to start with a quick brush-out once a week than to wait for the machine to clog. Over-cleaning is rare, but under-cleaning can cause the motor to strain as it works against the hardened coffee oils.
Judging Your Cleaning Results
A successful clean leaves the burrs looking bright and free of dark, caked-on coffee dust. You should see clear, defined ridges on the metal teeth of the burrs. If you still see dark patches, use your toothpick to gently scrape them away before vacuuming again.
A poor result often features lingering dust in the chute, which causes the next batch of coffee to taste bitter or stale. This happens because old, oxidized oils transfer their flavor to fresh beans. To prevent this, ensure the exit chute is completely clear by tapping the machine housing gently while the vacuum is running.
If you find that the chute remains clogged despite these efforts, use a stiff, non-metallic brush to dislodge the compacted grounds. Never use water to clear these blockages, as moisture inside the grinding chamber can cause permanent rust on the burrs. If the machine smells rancid after cleaning, run a small handful of dry, inexpensive beans through it.
Rules and Maintenance Standards
Wipe the hopper daily with a dry, lint-free cloth to remove coffee oils, which turn rancid within 48 hours and ruin the flavor of your next brew.
Store your bean hopper in a cool, dry place if you aren’t using it immediately. Moisture trapped in the hopper creates a breeding ground for mold that a simple rinse can’t eliminate.
If your machine makes a loud grinding noise or the motor stalls, stop using it immediately and contact the manufacturer for a professional inspection. If you hear a rhythmic clicking, check for a jammed stone in the burrs before calling; if the motor hums but doesn’t turn, unplug it to prevent a fire. Never attempt to disassemble the motor housing yourself, as this voids your warranty.
Alternative Cleaning Methods
Using Compressed Air
If you can’t reach small crevices with a brush, use a can of compressed air. Hold the can upright to avoid spraying liquid propellant into the machine. This is faster than a vacuum but can be messy, so perform this step outside or over a sink to catch the flying dust.
Grinder Cleaning Tablets
These tablets are designed to absorb oils and dislodge particles without disassembly. You simply run a handful through the grinder on a medium setting. This doesn’t replace manual brushing, but it’s an excellent way to maintain the burrs between deep cleans.
Professional Servicing
If your grinder produces uneven grinds or feels hot to the touch, you may need professional help. A technician can calibrate the burrs and check for worn components. This is a higher cost, but it extends the life of your grinder by years and ensures consistent performance.
Related guides
- Open Mccormick Pepper Grinder: Ultimate Guide to Fresh Flavor
- 10 Best Electric Grinder Coffee: Top Picks for Perfect Fresh Grounds
- How to Use a Mr Coffee Grinder? Easy Steps for Perfect Coffee Every Time
Frequently asked questions
How often should I clean my coffee grinder?
You should clean your machine every 2 to 4 weeks depending on your daily usage. If you notice a change in the flavor of your coffee or if the grind size becomes inconsistent, it’s time for a deep clean regardless of how many weeks have passed since your last session.
Is it safe to use water to clean the burrs?
No, you should never use water on the burrs. Moisture causes rust on the steel components, which ruins the precision of the grind and can lead to a metallic taste in your coffee. Always use a dry brush or a vacuum to remove grounds and oils.
What happens if I don’t clean the grinder?
If you don’t clean the grinder, old coffee oils will build up on the burrs and inside the chute. These oils go rancid, which will make your fresh coffee taste bitter or sour. Over time, the buildup can also clog the machine and cause the motor to struggle.
Can I use a damp cloth on the burrs?
No, never use a damp cloth on the internal burrs. A damp cloth is only safe for the external plastic or metal housing of the machine. If any moisture gets into the burr chamber, dry it thoroughly with a paper towel and let it air dry for several hours before reassembling.
Why is my grinder making a loud noise?
A loud noise usually indicates that the burrs are misaligned or a hard object is stuck in the mechanism. Immediately unplug the machine and inspect the burr chamber for debris. If the noise persists after cleaning, contact support for professional assistance.
Conclusion
Once everything is reassembled, run a small handful of fresh beans through the machine to season the burrs. You’ll notice the difference in your next cup immediately. It’s a simple habit that keeps your morning ritual tasting great, so don’t forget to set a reminder for your next deep clean.